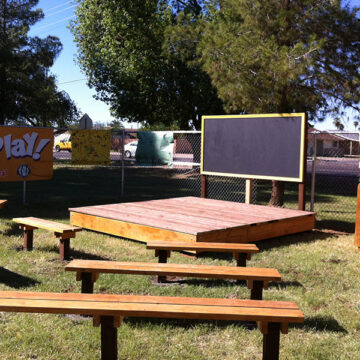
A stage enhances the play area by giving children a place to put on skits and plays, and serves as a space to hold other community events as well.


Materials & Tools

Materials Quantity
2x6x10' boards 21
2x10x10' boards 9
4x4x8' board 1
3" deck screws 5lbs
½x6" galvanized carriage bolts 16
½" galvanized washers 16
½" galvanized nuts 16
2"x10" joist hangers 8
1" Simpson nails 1lb
Tools needed
Miter saw
Pencil
Tape measure
Carpenter's square
Safety glasses
Drill
½" long drill bit
Screwdriver bit
¾" socket with ratchet

Preparation Instructions

  1. Sort all materials into piles by like item to ensure you have materials needed to complete project.

  2. Do NOT cut the [12] 2x6x10' boards. Set aside until you are ready to build.

  3. Take [2] of the 2x10x10' boards. Cut each down to 118", for a total of [2] 2x10x118" pieces.

  4. Take [6] of the remaining 2x10x10' boards. Cut each down to 115", for a total of [6] 2x10x115" pieces.

  5. Take the remaining 2x10x10' board. Cut down to [2] 2x10x20 ¾" pieces and [3] 2x10x22 ½" pieces.

  6. Take the 4x4x8' board. If the stage will be free-standing, cut down to [4] 4x4x12" pieces. Leftover lumber can be used for another project.

    If the stage will be concreted into the ground, cut the 4x4x8 down to [4] 4x4x24" pieces
    .

Build Instructions

  1. Before building, inventory and sort all of your materials.

  2. Start with one of the 2x10x115" pieces and [2] of the 4x4 pieces. Use [2] screws at each end to attach the 2x10 to the 4x4s, ensuring it is flush with the top of the 4x4s. Then do the same with another 2x10x115" piece to the other two 4x4s.

    If setting the stage in concrete, use the 4x4x24" pieces.
  3. Next, use [2] of the 2x10x118" pieces to connect the two assembled sides. These longer 2x10s should run past the 4x4s and finish flush with the outside of the previously attached 2x10x115" pieces. Use [3] screws to attach one 2x10 to the other and attach to the 4x4 as well.

  4. Now install the ½" carriage bolts, making sure to have the washers and nuts on the inside of the stage. Use [2] bolts for each 2x10 to 4x4 connection ([4] bolts through each 4x4). Make sure to stagger the bolts so that you don’t try to drill through one. Use the ½" drill bit to pilot these holes.

  5. Then, add the rest of the 2x10x115" pieces by fitting them in between the 118" boards, making sure to set the tops flush on both sides. Space the 2x10x115" boards 24" center-to-center except at the ends: the first and last 2x10x115" should be 24" to the outside of the existing 2x10x115". Use a joist hanger and 1" Simpson nails at each connection.

  6. Install the 2x10 blocks between each of the 2x10x115" boards, making sure to keep all the tops flush. Use the 20 ¾" blocks at the ends and the 22 ½" blocks in the middle to maintain your 24" joist spacing. Use [3] screws for each connection. Run them in the middle of the 115" span, but offset them as shown to make it easier to screw them in.

  7. Attach the deck boards. Attach the first 2x6x10' board to the 2x10x118" edge and overhang it by 1 ¾" in both directions as shown to the right. Secure the 2x6 by using [2] screws in every 2x10x115" joist (the first and last 2x6 will be nailed down into the 2x10x118" board). Place the next 2x6 next to the first, making sure to leave a ¼" gap. Continue across the stage - the last board should overhang the last 2x10 by the same 1 ¾".

    If you will be setting the stage in concrete, dig [4] holes that are 6" in diameter and 12" deep. Use a level to ensure that the stage stays level as you pour concrete into the holes around the legs.

More enhancement projects